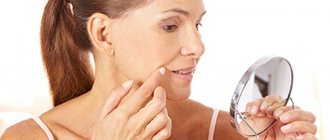
Exercises for losing weight on your face
Millions of women have already tried a special yoga technique for losing weight on their face and are satisfied with the result.
It is important to conduct classes correctly and regularly. Here are some of the useful exercises:
Air rinse
How to do it:
- Closing your mouth, purse your lips.
- Fill the area under your upper lip with air and hold it there for about 10 seconds.
- Bring the air to your left cheek and wait 15 seconds.
- Bring the air to your right cheek and also hold for 15 seconds.
- Repeat the entire complex 10-15 times.
Benefits: Reduces cheek swelling.
Quick air rinse
How to do it:
- Taking a deep breath, fill your mouth with air.
- Quickly closing your mouth, move the air from one cheek to the other.
- It should look like you are rinsing your mouth after brushing your teeth.
- Do the exercise 15 times.
Benefits: Fat is reduced and muscles are toned.
fish face
How to do it:
- Pull in your cheeks and make a bow on your lips.
- Without changing the position of your face, try to smile.
- Hold this state for five seconds.
- Do the exercise 10 times.
Benefits: Facial fat deposits are reduced and skin tone improves.
Cheek lift
How to do it:
- Raise your head and look up.
- Pull your lips out, pressing them tightly together.
- Hold this position for 10 seconds and then relax your face.
- Repeat 10 times.
- In this case, only the lip muscles should be tense.
Benefits: Reduces double chin.
Lion face
How to do it:
- Inhale through your nose, clenching your fists and the muscles of your entire face tightly.
- Sticking your tongue out to its maximum length and opening your eyes wide, exhale slowly through your mouth.
- At this moment, unclench your fingers.
- Freeze in this position for 10 seconds, and then relax.
- Repeat three times.
Advantage: the facial muscles are trained, stretched, and their tension is reduced.
Lower lip lift
How to do it:
- With your head in your normal position, looking straight ahead, lift your lower lip, engaging your lower jaw.
- You should feel the muscles of your chin stretch.
- Stay in this position for about 10 seconds and relax your face.
- Repeat 10 times.
Benefits: rejuvenates and tightens the skin.
Lip training
How to do it:
- Place your upper lip over your lower lip.
- Pull it up, closer to your nose.
- Stay in this position for 15 seconds, then relax.
- You will feel the muscles of your jaw and chin working.
- Repeat this 5 times.
Benefits: the work of the muscles of the chin and cheeks is activated, and the process of losing weight is accelerated.
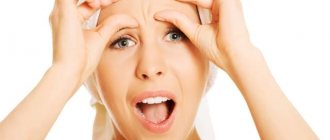
Surprised face
How to do it:
- Open your eyes wide, trying not to wrinkle your eyebrows.
- Look at some point at a distance of at least 2-3 meters in front of you.
- Hold this position for 10 seconds, then relax your muscles.
- Repeat four times.
Benefits: smoothes the skin in the eyebrow area.
Jaw workout
How to do it:
- Move your jaw as if you were chewing something.
- Make sure your lips are closed at this time.
- Take a deep breath and exhale for a long time with a slight hum.
- Open your mouth wide and press your tongue against the back of your lower teeth.
- Stay in this position for about five seconds, then relax all the muscles of your face.
- Repeat 10 times.
Benefits: Improves jawline and lifts cheekbones.
Blowing air
How to do it:
- Sit up straight, tilt your head back and look up.
- With your lips stretched out as far as possible, blow.
- Continue doing this for about 10 seconds and then relax.
- Repeat 10 times.
Benefits: the tone of the muscles of the face and neck improves, the double chin decreases, the face acquires a natural lifting effect.
Kiss from Marilyn
How to do it:
- Having made your lips into a tube, blow an air kiss.
- Repeat this four times.
- Purse your lips between your middle and index fingers.
- Blow a kiss again.
Benefit: improves the tone of the labial muscles.
doll face
How to do it:
- Slightly lift the area of skin between your lips and nose.
- Smile.
- Using the fingers of both hands, firmly fix the cheekbones and the area between the lips and nose.
- Try to lift the muscles of these areas upward in this position.
- It is useful to perform the exercise 20-30 times.
Benefits: Fat deposits on the cheeks and microwrinkles between the nose and lips are reduced.
Start doing these simple exercises and you will soon notice how the health and beauty of your facial skin will improve.
Enlarge your cheeks professionally
You can increase the volume of your cheeks through cosmetic procedures and surgery.
Lipolifting for the face
The technique involves transplanting the patient's own fat using injections into the cheeks. The most commonly used fat is the thighs and buttocks. It is processed in a special way and implanted in the desired area of the face.
Advantages of the method: there are no allergies to injections, low probability of rejection, lasting results, no scars, quick visible effect, speed of procedure.
Disadvantages: with low qualifications of the doctor, numbness of the area or facial asymmetry may occur.
Implantation
Plastic implantation can be combined with other surgical procedures, for example, contour lifting. How to make your cheeks bigger with implants? The surgeon makes an incision under the patient's eye or in the mouth. The implant is placed in this pocket. Most often, the implant is made of silicone. And it is held in place by the pocket itself, nearby tissues or the cheek bone.
The incision is sutured, the surgeon places a drainage to avoid hematomas. Duration of surgery: 30–40 minutes.
Advantages of the method: long-term effect, easy to combine with other plastic methods.
Disadvantages: possible loss of sensitivity in the operated area, displacement of the implant, restriction of sports activities during the rehabilitation period, retraction of the eyelid; if the tissue becomes infected, it is removed.
Meloplication to lift the cheeks
This subcutaneous lift is done using two incisions. One is near the mouth, the second incision is made near the temple. The surgeon trims the fat pad of the cheek, pulls it towards the temple and stitches it up. As a result, a high cheekbone is formed, the shape of the cheeks is corrected, the nasolabial fold becomes less pronounced, and the drooping corners of the mouth are raised.
Golden threads
How to enlarge and tighten your cheeks with gold threads? When reinforced with gold threads. Platinum or gold threads with a thickness of less than 0.1 mm are used. The threads are coated with polyglycolic acid. After insertion, a collagen fiber is formed near each thread. This happens 2–6 weeks after the procedure. Over time, the acid is absorbed, and the skin turgor supports the frame formed by the patient’s tissues.
Most popular: Does your facial skin need thermal water from the depths of the earth?
The threads are inserted using a special tool. The surgeon creates a frame that holds the facial skin in the desired position, preventing it from sagging. The procedure can be done on any part of the face or its entire surface.
Reinforcement is done under local anesthesia. After the operation, only punctures and light bruises remain. The marks left after the procedure disappear within 7–14 days.
Contour plastic
The doctor injects fillers under the skin, which can replace surgery. After the procedure, the muscles acquire the necessary tone and increase in volume. Such procedures are performed using Juvederm, Radiesse, Restylane, etc. What problems can be solved with fillers?
- give the cheeks the desired shape
- moisturizing the skin
- increasing volume in the cheekbones
- rejuvenation of this area
- give symmetry to the face.
- Blepharolifting will help change your look.
Cheek dimple surgery is also popular now.
Complications after surgery
Immediately after surgery, some patients complain of numbness in the areas of the face where the incisions were made. This may be due to nerves affected during the surgeon's actions.
The following phenomena often occur:
- Painful sensations
- Hematomas
- Abscesses
- Tissue inflammation
- Poor healing
- Allergic reactions to anesthesia
- Injury to blood vessels, muscles, nerves Asymmetry, implant displacement
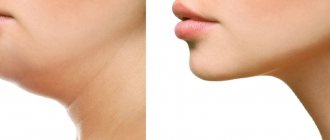
Universal exercises for the face and neck: the perfect oval
When you yourself understand that you most likely will not accomplish most of what you have planned, then you should try doing exercises to strengthen the oval of your face; even if not regularly, they will definitely not cause harm, but will only help. Of course, it’s worth being consistent and finishing the job, especially since thousands of women have already tested the results on themselves and were very satisfied. This simple and absolutely affordable complex will get rid of premature and unsightly “bulldog” cheeks and eliminate even a hint of a double chin, tighten the skin and give it tone, and form beautiful sculpted cheekbones.
Exercises for the oval face from sagging cheeks
Stand or sit straight, looking ahead, this is the optimal position for performing all the exercises of this complex. Take in more air into your mouth and puff out your cheeks, while trying to close your lips as tightly as possible. Fix your position for a few seconds.
Place your palms on your swollen cheeks and press lightly until you feel the muscle tension, then release. Repeat pressing on your cheeks twenty times, if at the end you feel a burning sensation in the muscles, this is normal, it means lactic acid is being released, which is what was required. For those who are planning to tighten their face shape, the exercises are just right, and the video below will help you figure out the details.
American smile: lips, cheekbones and cheeks work
Gymnastics for the oval of the face implies regularity of exercises, otherwise you will have to wait a long time for the result. However, after ten to fourteen days you will definitely notice how your face changes, becomes fresher and younger, and its contours acquire clarity and beauty. Purse your lips tightly and, without exposing your lips, try to smile as widely as possible. It is necessary to stretch your lips in a smile until you clearly feel all the facial muscles. Freeze for a few seconds.
Pull your lips forward, gathering them as if to blow a kiss. Fold the tube, closing your lips as tightly as possible, while stretching your head forward while your body remains in place, and freeze again for a few seconds. Repeat the exercise two dozen times.
We tighten the muscles of the cheeks
In order for the gymnastics to tighten the oval of the face to work, do not forget about constant tension and fixation of each movement. It is necessary to freeze for a few seconds after each action in order to work the muscles well. Fold your lips as if you were about to say the letter “O” and hold in this position. Tighten your lips as much as possible and press them against your teeth.
Move your tongue in a circle, first along the left and then along the right cheek from the inside, as if doing a kind of massage of the internal surfaces. You can write letters or symbols, you can make patterns and ornaments, the main thing is that at this moment you clearly feel the tension.
Chin, neck, lips: working on ourselves
It wouldn’t hurt to include in this universal complex also exercises for the oval of the face and the double chin, that is, just so that it never appears in your life or disappears from it forever. This is a complex and multi-step exercise, so you should read the instructions very carefully on how exactly, what and when to do, and be extremely careful, since it involves throwing your head back, which we have already mentioned.
- Sitting straight on a chair, raise your head up, look at the ceiling, and stretch out your lips like a tube, as if you are reaching out to kiss someone. Freeze in strong tension for a couple of seconds and relax.
- Tilt your head, smoothly moving the top of your head in semicircles, either to the left or to the right shoulder. Freeze at each extreme point, clearly recording the movements.
- Throw your head far back, and then return it to the starting position again.
If you do everything regularly and correctly, then in the second week you will already be able to notice significant results. However, this is just a basic universal complex, and there are also special exercises aimed at training certain muscles. You should never stop there, you should always move forward so that even at fifty you look like you were twenty-five.
Cheek reduction
If you are tired of chubby cheeks and want to reduce their volume, then do this exercise regularly. The first thing you will need to do is place the 3 middle fingers of your right hand in your mouth. But the left palm must be placed on the left cheek area. Inhale air deeply through your nose, trying to inflate your cheeks as much as possible with the absorbed oxygen. Be sure to keep your mouth tightly closed. Gently press down on your left cheek with your hand. Hold this position for a while and then release. You need to repeat these steps about 10-12 times on each side.
From athletes to Hollywood stars: men Naomi Campbell
“Olga” from the series of the same name: the tragic fate of actress Yana Troyanova
Only on a soft spot: Russian Domostroy forbade punishing children in any other way
We make cheekbones with hyaluronic acid
Aesthetic medicine also has its own options for solving the problem of lack of cheekbones. These are injections of hyaluronic acid. They are performed with a special solution of hyaluronic acid and the finest silts. The introduction is carried out to a shallow depth - up to 4 mm. Due to this, the procedure has a very short recovery period and a pronounced effect.
Hyaluronic acid for cheekbones
To make the cheekbones with hyaluronic acid, the solution is injected into the mentalis area and the cheekbone area. To achieve a natural effect and avoid a “doll” face, the area of work is divided according to the so-called. "golden" section. That is, the master determines the maximum possible size of the cheekbones and chin so that it does not look flashy and begins the harmonization procedure.
How are hyaluronic acid injections done for the cheekbones:
- The specialist makes pinpoint punctures in the areas being treated. The needle is inserted only at an angle of 45 degrees. Maximum penetration depth is 4 mm.
- On average, up to 15 punctures are allocated to the cheekbone area, and up to 20 to the chin area.
- After the end of the session, the cosmetologist must apply an antibacterial cream to the skin and give a short massage to quickly relieve swelling. The result of the procedure will be noticeable the next day.
After 3 months of “exploitation” of hyaluron, correction will be required. If you are tired of chiseled cheekbones, then simply do nothing and the acid will come out on its own without any consequences.
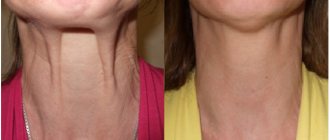
Lymphatic drainage massage
A simple facial massage will help:
- highlight cheekbones;
- improve skin color;
- remove excess fluid from soft tissues;
- increase the tone of the muscles on the face;
- tighten the contour.
If you can’t find time every day, then 2-3 times a week also gives good results.
Massage stages:
- Lubricate your hands with cream.
- Place your palms on your face to increase blood flow, starting from the center, moving towards the temple.
- Using your fingertips, stroke your face from the back of your nose to your temples, then down to your neck, 5 times.
- Under the eyes, gently sweep from the outer corner to the inner corner.
- From the wings of the nose, sweep under the cheekbones to the top of the ear, then down to the neck, 5 times.
- Swipe from the corners of the mouth to the middle of the ear, then from the center of the chin to the earlobe, 5 times.
The following movements will help remove cheeks:
- Walk along the same lines with quick taps with your fingertips, along each line 5-6 times.
- Next, use point pressure to follow the same lines, avoiding the area under the eyes.
- Place the edges of your palms on your cheek, starting from the back of your nose, like a saw, move your palms along your cheekbones to your temple.
- Make 10 circles on each cheek clockwise, then counterclockwise.
- When completing the massage, stroke your entire face along the indicated lines.
From personal experience. Try this type of massage regularly to stop or reverse the aging of your skin.
See also on the blog: How to do facial massage: 10 best techniques
Why do some girls have chubby cheeks?
View this post on Instagram
Publication from