The sequence of applying makeup to the face and eyes is very important to obtain beautiful makeup. This especially applies to a complex evening version, while daytime makeup usually requires only face powder, mascara and lip gloss. So, what are the rules and procedure for applying makeup ? First of all, you need to pay attention to correcting imperfections: facial asymmetry, problem skin, irregular shape of lips and eyebrows, and so on.
Step-by-step and correct application of foundation on the face
3. The next step is to apply foundation. It is very important to choose the right shade and texture for yourself. Girls with problem skin should choose light, fluid tones, as denser ones will only emphasize the unevenness of the skin and aggravate the problem. Apply foundation using makeup brushes, sponges or directly with your fingers. Makeup artists recommend the latter option. Under the influence of the temperature of your hands, the foundation heats up and lies more evenly on the skin. Dense textures, such as camouflages, are applied with a damp sponge. Just remember to wash the sponge after each use! Because bacteria quickly accumulate in it. Apply the foundation with light movements along the massage lines, do not pull the skin. Conceal imperfections (pimples, redness, dark circles under the eyes) with a greasy concealer using your fingers or a synthetic brush.
Contouring the T-zone and cheekbones
An important stage that will highlight the beauty of a woman if you follow the sequence of applying makeup and pay attention to the shape of your face.
It can be round, square, triangular, oval and heart-shaped - it’s easy to determine if you look in the mirror.
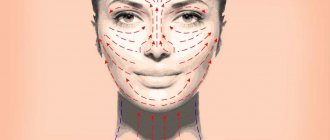
Contouring has general rules:
- Start with the nose - use the corrector to draw 2 lines along the sides of the bridge of the nose to the very tip. The more you need to lengthen the nose, the higher (up to the eyebrows) the lines begin.
- Use bronzer to darken the hollow under the cheekbone. It may not be noticeable. To determine its location, it is enough to draw a mental line from the ear to the edge of the lips - on this line there is a depression.
- Darken the forehead: apply bronzer from above, from the hairline, moving to the sides, outlining the oval of the face.
- Darken the areas of the upper eyelids.
- Highlighting: use a highlighter to highlight the bridge of the nose (a straight line between the dark stripes already drawn), the center of the forehead, the corners of the eyes and the cheekbone (a little above the bronzer).
- Use brushes to blend the applied products to make your face look natural. There should be no sharp boundaries.
There are additional recommendations for each face shape.
- Round. This geometric figure is drawn mainly from the cheeks, so special attention should be paid to them: highlight the cheekbones well, make the side lines longer. The face is also drawn out by lightening the bridge of the nose (you can start the highlighter strip from the middle of the forehead), light “triangles” under the eyes closer to the nose and a light chin.
- Square. It is necessary to soften the clear “angles”: the sides of the forehead and chin. It is wiser to darken these areas, and lighten the area around the nose (the triangle from the inner corners of the eyes to the lips).
- Triangular. To visually narrow the forehead, it will be effective to darken the sides. The smoother the lines of the chin, the more harmoniously it will blend with the rest of the face.
- Oval. The most proportional type that doesn't require much contouring. If desired, you can touch up your cheekbones with bronzer or blush and darken the side of your nose further to make it neater.
- Heart-shaped. With this face shape, you can’t go overboard with contouring your cheeks. A light, not very dark line is enough. As with a square face, darkening the forehead will work here, but on the lower part of the face dark lines should be avoided.
Face correction when applying makeup step by step
4. Then proceed to correcting the shape of your face using blush or dry correction products. We described how to do this correctly in one of the previous articles.
5. A very important point in makeup is the correct shape of the eyebrows. To beautifully highlight the eyebrow line, use a pencil or special eyeliner. They have a greasy texture, and this allows you to simultaneously highlight the eyebrow and manage unruly hairs. You can also line your eyebrows with dry eye shadow. Try to choose the right shade for your eyebrows. The color of the eyebrows should match or harmonize with the shade of the hair.
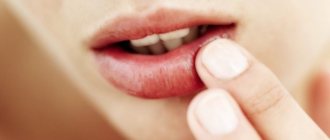
6. Not all girls need lip shape correction. Some have a symmetrical shape and a clear contour, and some simply do not use lipstick and lip pencils, preferring neutral glosses. If you still need to emphasize the contour or visually enlarge the shape of your lips, use a pencil of the required shade. Outline your lips, maintaining symmetry.
Stages of applying makeup
Once the color type of appearance has been determined and the set of decorative cosmetics is ready for use, you can begin applying makeup. However, there is a rule in this technique that allows you to create an impeccable image: all stages of this process must occur step by step, one after another and only in a certain sequence.
Preparing the face
Facial preparation consists of 3 stages: cleansing, restoring the acid-base balance and moisturizing. For high-quality skin cleansing, you can use a gentle peeling or a special scrub. After the remnants of cleansers are washed off the face, it needs to be toned. There are a lot of tonics and lotions for these purposes, but it is better to opt for products that do not contain alcohol and other aggressive components. The final stage of preparing the skin for makeup is moisturizing. For dry skin, special masks are recommended that allow you to retain moisture and a healthy appearance for a long time.
Preparing the face
And for normal skin types, a light texture moisturizer is quite enough. As a result of the step-by-step application of all the necessary products, the skin becomes ready for the next steps of makeup.
Working on your complexion
Not every morning a woman wakes up with a perfect complexion: stress, overwork and inadequate sleep do not contribute to good skin condition. But in order to always look perfect, there is a secret weapon: base, corrector, concealer and foundation. There is a special scheme for their application:
- Initially, a base is applied, which is a silicone-based liquid cream. The main tasks of the base are to smooth out the texture of the skin and hide its small defects. In addition, the base is a base for makeup.
- If necessary, a corrector is used after the base. It is designed to disguise minor imperfections: pimples, blemishes and small scars.
- Concealer is a special product for hiding multi-colored spots on the face: redness, bruises, etc. The concealer is available in several colors: greenish, yellow and pink. It is better to apply it with a special brush or fingertips.
- The next step in working on your complexion is foundation. Makeup as a whole directly depends on its quality and color. The color of the foundation should be as close as possible to your skin tone. To create a natural complexion, you need to choose a foundation with a weightless and transparent texture. You need to apply foundation not only to your face, but also to your neck and décolleté.
- The final step is applying powder. At home, it is better to give preference to its crumbly, light form: it does not weigh down the skin, does not clog pores and gives the face a natural matte finish.
Apply the powder using a large brush, using gentle shaking movements, from top to bottom.
Eyes and eyebrows
There are separate cosmetics for applying eye and eyebrow makeup: hard and soft pencils, liquid eyeliners, shadows, mascara, etc. The process of making up this area of the face is complex and painstaking. The key to success here is restraint and accuracy.
If you are satisfied with the shape and color of your eyebrows, then it is enough to give the hairs the desired direction and fix it with a special gel. For invisible and light eyebrows, there are special pencils in natural shades that allow you to make them more expressive and give the desired shape.
And now the eyes...
There is a certain sequence in the design of the eyes. The shadows are applied first. They are dry and liquid. In hot weather, liquid shadows roll down and do not hold the design. Dry shadows crumble in windy and frosty weather. A natural background is applied under the main shadow pattern. Thanks to it, the remaining colors will apply efficiently and evenly.
Pencils and liquid eyeliners are used to create evening, oriental and vintage looks. Special brushes are used to apply them, and the result depends on certain skills and dexterity.
Applying mascara is the most important and difficult step in doing makeup. One awkward move can ruin all the work on creating an image. Mascara comes in different colors, with a volume effect and for lengthening eyelashes. It is important to choose the best option for yourself. It’s good if, in addition to mascara, you use a special rubber comb that allows you to adjust the direction of your eyelashes. Makeup artist advice: if mascara is applied in several layers, then you need to completely dry the previous one before applying the next one to avoid the effect of sticky ends.
Lip design
The next point in working on makeup is the lips. Even the best lipstick will not look natural on sore and dry lips. It will only highlight all the shortcomings. The delicate skin of the lips requires preparation: careful peeling, moisturizing procedures and a softening balm.
The lip liner should only unobtrusively emphasize their natural shape, and its color should match the tone of the lipstick. The contour pencil is applied in small strokes, starting from the center of the upper lip to its edges, and the lower lip is drawn in with gentle movements from left to right.
Lip design
It is better to apply lipstick with a short small brush, in small strokes from top to bottom. This will allow it to fit along the natural lines of the lips. If necessary, apply gloss on top of the lipstick. It is usually used to create evening, romantic looks, as it gives the lips additional volume and sexuality.
Applying blush
With proper use of blush, you can not only emphasize the special shape of your face and highlight your cheekbones, but also hide certain imperfections. To apply blush, use a large, voluminous brush made of natural fibers.
When applying blush, you must remember the main rule: they should not look like a colored spot with sharp and clear boundaries. The presence of blush on the face only helps to create a certain background and place emphasis on the right place.
Any makeup application technique requires certain skills, experience and a sense of proportion. Having mastered this art, any woman can be beautiful and irresistible, no matter what.
Sequence of applying eye makeup
7. The final stage in applying makeup is eye makeup. This usually takes up most of the time. Use the products you want: liquid or dry shadows, eyeliners, mascara, false eyelashes, shimmering mica. Transitions from one color to another and shading of shadows should be smooth, and the arrows should be even and clear. Make sure that the shadows and mica do not fall off, and that the eyeliner and mascara do not overprint.
After your face makeup is finished, you can use various fixing products: fixing powder, spray, thermal water. They will fix makeup and give the face a matte finish. Just don't use powder and spray too often, they dry out the skin. Follow this sequence of applying makeup, and it will be beautiful, long-lasting and of high quality. Well, we wish you to always be the most beautiful! We highly recommend watching a great video about the makeup application sequence right now.
The correct sequence in makeup. Step-by-step application of makeup on the face video lesson for beginners
Vertical diagram:
As you have already seen in the photo above, colors or their shades are applied in vertical stripes, but this is a diagram. How is this applied in practice? Most often, this scheme is used to correct the distance between the eyes :
- To visually enlarge it , the inner corners of the eyelids are highlighted, and light shadows (usually white or ivory) are applied to 1/3 - ½ of the upper eyelid closer to the bridge of the nose. Closer to the temples, a dark color is applied, the transition from light to dark is shaded. For a smoother gradient transition from one color to another, you can use an intermediate shade (medium in saturation). For example, white – sand – dark brown (see “Caramel” eye makeup). In addition, this arrangement of light and dark elements allows you to correct deep-set eyes (light visually brings them closer, thereby reducing the recess), as well as an overhanging eyelid , which is usually found in conjunction with deep-set eyes: a dark element placed on the lower part of the overhanging eyelid, visually lifts it up (as an example, we looked at 2 makeup options: “Bouquet of lilacs” and “Eye makeup in brown tones for older ladies”).
- To reduce the distance between the eyes, shadows are applied exactly the opposite. But due to the fact that this type of makeup is not very attractive from an aesthetic point of view, it is used very rarely in its pure form. The most commonly used combinations are: medium shade – light – dark, or: dark – light – dark, or: dark – medium – dark. These variations are found under the name "apple".
EYE MAKEUP “CARAMEL”
The color scheme of eye makeup using a vertical scheme can look like a stretch of one color from a light shade to a dark one, or like a set of different colors combined with each other. The minimum number of colors or shades is 2, the maximum depends on the length of the eye and the skill of the makeup artist; in the end, it determines whether the end result will be beautiful, and makeup should look beautiful on open eyes, and not just on closed ones.
Now just a few words about what a “bird”, “corner”, etc. is. If you carefully consider all these eye makeup options, it’s hard not to notice that they differ only in the shape of the dark element facing the temple. It follows from this that the “bird”, “corner”, etc. are modifications of the vertical scheme. We deliberately do not publish photos here with these makeup options; if you want to compare them yourself, then just type “bird makeup” or “eye makeup techniques” in any Internet search engine.
As a special case of a vertical scheme, the so-called diagonal scheme for applying shadows can be considered (see eye makeup “Amethyst shimmer”).
EYE MAKEUP “AMETHYST SHOWING”
With open eyes, it looks almost the same as the vertical scheme; the differences are visible only with closed eyes: the color stripes are applied at an angle towards the temples. A significant advantage of this option for applying shadows is that it is easier to visually lift the outer corners of the eyes, if required.
Drawing arrows and eye contours
The arrows help to enlarge the eyes and give expressiveness to the look.
Use 3 products: eyeliner, eye shadow and pencil:
- Pencil is an option for girls with no experience in applying makeup. It is comfortable and easy to wipe off. The downside is that it doesn’t last as long as other cosmetics and can fall off if you don’t set the edges of the eyeliner with powder.
- Eyeliner is a more durable product, and the arrows with it turn out more expressive and neat. It requires experience to use it. At first, you can use a felt-tip eyeliner (it has a thin tip and does not smear).
Eyeshadow lines look harmonious, but due to the crumbly structure, it can be difficult for beginners to apply them strictly along the contour of the eye. Less popular remedy.
The rules for drawing arrows and eye contours are similar for any cosmetics.
- Line the upper eyelid along the lash line. Start from the inner corner or from the middle of the eye, depending on the desired result.
- Mark with a small dot where the tip of the arrow should end.
- If necessary, thicken the eyeliner line and smoothly connect it to the mark.
- Adjust the “tail” of the arrow.
- Bring the lower eyelid as close to the eyelashes as possible. This item can be omitted if you need light makeup.