| Place | Name | Characteristics in the rating |
| Top 10 Best Contouring Palettes |
| 1 | The Saem Eco Soul Contour Palette | Best quality and composition |
| 2 | REVOLUTION Ultra Cream Contour Palette | The most inexpensive professional contouring palette |
| 3 | Vivienne Sabo Mariniere | Great option for beginners |
| 4 | Pierre Rene Powder Contouring | Compact package size, travel version |
| 5 | Pupa Contouring & Strobing Palette | Durability, natural shades |
| 6 | Maybelline Master Bronze | The best option for summer |
| 7 | Wet n Wild Megaglo Contouring Palette Contour | The most natural effect |
| 8 | DIVAGE Good Vibes Only | Large set at an affordable price |
| 9 | `NYX PROFESSIONAL MAKEUP` HIGHLIGHT & CONTOUR CREAM PRO PALETTE | Delicate creamy texture, bright and long-lasting pigment |
| 10 | Note | Simple but functional palette |
The main task of decorative cosmetics is to hide facial imperfections and emphasize advantages. Contouring palettes are a great help in this difficult task. With the help of several light and dark shades included in the set, you can highlight and even change your facial features, giving them an aristocratic look. Emphasizing the cheekbones, visually narrowing the wings of the nose - contouring products can do these and many other tasks. In other words, their goal is to make the face even more attractive and harmonious. There are many different contouring palettes on sale now. They can have a creamy or powdery texture and vary in the number of colors and shades. In this rating you will find only the best facial contouring palettes.
Face sculpting technique
For contouring you need a base. Get rid of uneven color, even out tone and remove dark circles under the eyes, and, if possible, eliminate minor imperfections on the skin. To do this, be sure to apply a light moisturizer to your face and neck, and then create a foundation with foundation. But under no circumstances overdo it with foundation! There should be very little of it, as a base for further contouring. When creating makeup, you can use a fashionable product - concealer, which masks imperfections on the face, especially in the area under the eyes.
So, prepare your brushes and concealer palette, and then begin the process:
- Start by highlighting the area under your eyes. Apply a little light corrector in the shape of a triangle to this area with a brush. If you have clear nasolabial folds, they also need to be lightened. All this will help to visually emphasize the cheekbones and make the eye shape larger.
- Then apply a light-colored concealer to the bridge of your nose. The thinner this line is, the narrower the nose will look.
- Highlight the forehead area. If you have a low forehead, your skin only needs to be lightened. But if your forehead is high, then you need to first apply a light-colored corrector in the form of a triangle in the middle of this area and above the eyebrow arches, and then darken the area under the hairline.
- To highlight your cheekbones, apply a strip of light-colored concealer underneath them.
- Highlight the area on the chin where the light will fall. Don't touch the bottom edge.
- Using a light concealer, apply two narrow parallel stripes to the swoosh area above the upper lip, visually lifting it. You can also highlight the contour of your lips using a light tone, so they will appear larger.
- Apply a light shade of product under your eyebrows, visually lifting them.
- Darken your cheekbones by lifting the lines upward so they point toward your temples.
- Use a dark color to outline the overall contour of the face.
- Take a narrow brush and draw dark lines on the back of the nose, as if outlining its tip.
Creamy or dry - how to choose a contouring base
Now you need to choose dry or cream contouring, it depends on your skin type.
If it’s dry, then blush and powder applied with brushes are used. This option is suitable for beginners; it will also be easier for those whose skin is quite oily. After applying the cream structure to your face, dust with regular powder to prevent the dry sculptor from sticking. A cool-toned blush is suitable for highlighting cheekbones. If you don’t want to stand out, use warm colors. On a thin and long face, blush is applied in horizontal lines to the apples of the cheeks, on a round face - in vertical lines, on a rectangular face - blush is applied to the protruding parts of the cheekbones and along the entire jaw.
If it is creamy, then contouring is done with a contouring stick, corrector and foundation of different shades. This method is suitable for dry skin. For application, you need to purchase sponges, since your fingers will not always be able to distribute the product evenly. If you want to work with your fingers, pre-warm them and rub your palms.
How to blend corrector correctly
General rules for using a corrector:
- You can do shading using a sponge or brush, which you need to dial in the tone. Start with lighter areas, such as under the eyes, and rub the product in. Then you need to shade the dark areas on the cheekbones, stretching the contour first up in one direction, and then down in the other. Under no circumstances should you do this randomly! It is important to use smooth, soft strokes down and up.
- Dark areas in the forehead area are usually shaded first up towards the hairline and then down towards the middle of the forehead.
- The most difficult area is the nose. You need to start rubbing from light, moving up to the bridge of the nose, and then down to the tip of the nose. Blend the dark stripes on the back down towards the wings. The area of the tip of the nose is shaded to the right and left.
- Use a large brush to powder your face using light strokes.
- As a final step, apply a small amount of highlighter to the inner corner of the eye, to the area above the cheekbones and temples, to the swoosh above the lip and to the area under the eyebrows.
- Apply blush to your cheekbones.
Oily corrective products for facial contouring are applied in the same way.
Remember that make-up helps to change your face and highlight your winning sides while hiding your flaws. Contouring helps make natural beauty more visible. The main thing is to learn how to perform all actions carefully and choose shades that suit you perfectly. Keep in mind that skin colors of corrective products are chosen based on your own skin tone.
Valuable advice
- As you perform each exercise, imagine a stream of energy that flows through each of your muscles, washing it and forcing it to tense and work.
- Focus your attention exclusively on the area of the face you are working with right now. Don't get carried away with fantasies about your new holistic look. You'll do this later.
- When performing any exercise, to concentrate, you must straighten your back, draw in your stomach and buttocks, and tighten the front of your thighs. At the same time, the static load on the muscles will tighten the lower body. This position will be the starting position for each part of the gymnastic complex.
- Each exercise must be completed with complete muscle relaxation. This is done like this: squeeze your lips as tightly as possible and sharply make the sound “pfr-r-r-r-r”, achieving active vibration of the lips.
Sculpting Basics
The most important element of high-quality facial contouring is harmoniously selected colors. You need to find your own shades of correctors, both light and dark, that will perfectly match your skin tone. It is important that the cosmetics are not too dark or too light. In addition, you should never use dark shades that will look sallow on your face and make it look unnatural and unhealthy.
It is important to choose high-quality tools for make-up. For example, to model with dry correctors, you need to take large, angled brushes (blush brushes, etc.). There should be different brushes for each shade of concealer.
Contouring should be done in daylight whenever possible, even if you need to prepare for an evening outing. This is painstaking work that should not be done in a hurry. In addition, it is important that you clearly see how the chiaroscuro lines will look on your face after you have applied them. You can experiment and take a few photos so that the result is visible in the pictures if you are going to create an image for a photo shoot.
The scheme for applying light and dark tones correctors to the face will look like this:
Areas of dark color below the chin area, as seen in the diagram, will help to visually make a double chin appear smaller, as well as highlight a thin neck line. If you want to make your forehead appear smaller, apply a dark tone at the top, near your hairline. Retouching with dark correctors on the outside of the bridge of the nose and at the tip of the nose will help make it visually narrower.
This is what the contouring principle looks like for girls with different face shapes :
Contouring an oval face
In principle, this type of face does not require much correction. It only needs to be given relief and expressiveness. Here's a quick step-by-step guide to contouring an oval face (see photo):
Instructions for contouring an oval face
- highlight the cheekbones: to do this, find the hollow between the ear or mouth, pulling in the cheeks;
- apply a small amount of a correction product of a darker shade to this area; On the contrary, highlight the area located above;
- Apply a little light highlighter with reflective particles in place of the dimples that stand out when you smile;
- add a slightly darker shade to the center and sides of the chin.
Advice! Those with oily skin should be extremely careful when using highlighter. If there is an excess of it, reflective particles can play a cruel joke on you and visually enhance the shine. You especially need to be careful with the T-zone (nose-forehead-mouth).
What cosmetics and tools will be needed?
To correct your face shape, you can purchase a ready-made set (palette) to match your skin tone. Depending on the purpose, it can include from 2 to 10, and sometimes even up to 20 shades and textures of foundations, most often highlighters and powders. If you couldn’t purchase a palette, you can get by with regular foundations. We will need:
- cream base (primer);
- cosmetics to match your skin tone;
- foundation a couple of shades darker than your own skin;
- highlighter: a product that contains reflective particles, with the help of which we will highlight (highlight) and add highlights or hide certain areas, for example, fine wrinkles; it should be only slightly lighter than the skin;
- the powder is a couple of shades darker than the base cream;
- blush.
To correct your face shape, you can purchase a ready-made set (palette) to match your skin tone
. In addition to the cosmetics themselves, we will use the following types of tools:
- wide foundation brush;
- sculpting brush with slightly beveled bristles;
- a flat-top brush for applying loose cosmetics, unlike a kabuki brush (a short, slightly rounded brush with thick bristles), its cut should
- be completely flat;
- blush brush.
Advice! Do not try to apply makeup without a foundation - the foundation will apply less smoothly and crumble quickly. In addition, such a primer will allow decorative cosmetics to acquire more natural and rich shades.
What is contouring?
Even if you are completely satisfied with your face, using this technique you can make it even more expressive and bring it to almost perfection. Contouring is a true salvation even in the presence of any defects: asymmetry, a wide or, on the contrary, too narrow nose, excessively protruding parts, etc.
Very often this technique is called sculptural makeup. After all, it is really based on artistic techniques, in which, in order to emphasize certain features or, on the contrary, veil imperfections, darker and lighter shades of tonal means - light and shadow - are applied to the skin in a certain order.
Makeup artists divide this method of applying makeup into two main types:
- model: brighter, evening;
- everyday: used during the daytime.
In the latter case, the color transitions should be slightly noticeable. They should flow very easily and smoothly into other shades. The contours should be outlined as softly as possible.
Face correction can be done either with powder and blush (dry contouring) or with rich creams. The first method is lightweight and more suitable for smoothing out small imperfections.
Those who have mastered this technique to perfection will be able to magically transform their appearance every day.
Sculpting with products containing a fatty base should be carried out as carefully as possible - otherwise the face will turn into a mask. However, those who have mastered this technique perfectly will be able to transform their appearance in the most magical way every day.
Advice! To ensure that the shade is selected correctly, foundations should only be applied in maximum (ideally natural) lighting. Otherwise, the effect may be exactly the opposite of the desired one.
Tips to follow
Of course, the success of an enterprise is largely determined by the quality of the cosmetics used, and as practice shows, it is better not to skimp on this. For contouring, it is better to buy cosmetics from well-known brands and brands, as well as shading devices - a brush and sponge.
Although the brush can be quite ordinary, many girls also make it from their own hair and successfully use it in practice. As for the recommendations, they relate to the use of correctors depending on the type of face:
- To sculpt a square face, the highlighted areas remain the same, but the jaw should be added to the darkened areas.
- A round face needs to be visually elongated, which means its edges will have to be almost completely darkened. The dark corrector is applied to the sides of the forehead, temple area, completely covering the cheekbones and double chin, if present.
- For triangular and heart-shaped faces, a special feature is the application of a dark corrector in the forehead area. The protruding parts of the “heart” and the corners of the inverted triangle need to be darkened more actively, blending the product from the center of the forehead near the line where the hair grows, downwards.
- For an elongated oval face, a dark corrector is applied to the bottom of the chin on both sides of the highlighted area. This type of contouring is shown in the photo.
That's all the tips and tricks regarding contouring. Of course, before going out, you need to practice a little at home and see how your face looks with makeup using this technique. However, with a certain amount of persistence, everything will definitely work out, the main thing is to want it. Good luck!
Contouring a round face
Contouring a round face is one of the simplest types of makeup. 3 simple rules will help you make your sunny face seductively elongated.
- It is necessary to darken the sides of the face - jaw, cheeks and temples.
- Lighten the forehead, chin and lower eyelids using concealers or luminizer .
- A light tone is applied under the eyes, in the center of the forehead and on the chin.
The quick technique for contouring a round face is good for beginners. In makeup, theory means little; buy concealer palettes and start experimenting.
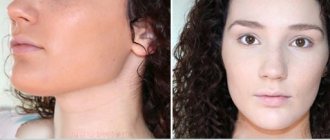
Where to start with a facelift?
The first thing that gives away a woman’s age is cheek jowls and a wrinkled neck. What is good for a Sphynx cat is not good for a lady. That's why we decided to focus on exercises that remove double chins, lift the lower part of the face and smooth out the skin on the neck.
Get ready for the first stage - exercises for beginners. You will perform the complex twice a day, seven days a week, for eight weeks.