Why do you need a face sculptor?
Filmmakers began to use facial sculptors. In the light of the spotlights, the actors' faces seemed flat; to add expressiveness, the Westmore brothers applied thin layers of makeup. Working with dark and light shades, they achieved relief and graphics. The faces of the actresses on the screen came to life.
The technique of cut-off correction has been adopted by makeup artists, actors, and announcers, and is now used at home. It’s interesting that we still use the diagrams drawn by the Westmore brothers for different types of faces.
Black and white correction solves a complex of problems.
- makes the look more graphic and younger;
- brings the oval of the face as close to ideal as possible;
- hides minor imperfections.
NYX Powder Blush #11 Taupe
The legendary facial sculptor, to whom foreign beauty bloggers sing odes and every third post on “Cosmetist” is dedicated to him.
The laconic packaging for a modest price contains a universal sculptor that can be used to treat the desired areas of the face. The color is complex: there are shades of gray, cool brown and pink. The color of the blush is ideal for most Slavic girls with a light beige complexion. The reddishness that bronzers are prone to is absent, so you can safely use blush as a sculptor. Price: from 500 rubles.
Cosmetologist's advice
For black and white correction, all well-known cosmetic brands produce products from foundations, sculpting powders and blushes, to light highlighters and shimmers, as well as modeling palettes. No matter what products you use, the main thing to remember is that your skin must be spotlessly clean.
Advice: since several layers of cosmetics are applied, you will also have to wash it off in several steps. After washing, do a control procedure - wipe the skin with lotion.
Common Mistakes
Sculpting the face (step-by-step photos cannot reflect all the details and subtleties of the technique) can occur with errors.
The most common of them are:
- Inability to model a face in accordance with individual characteristics. Contouring is not intended for drawing a new face. This technique only allows you to adjust facial features so as to highlight your strengths and darken your flaws. Don't lose your individuality.
- Incorrect placement of light highlights, which disrupts the harmony of makeup. You should not apply highlighter all over your face or large areas, as it is intended only for placing light accents and does not serve as a replacement for powder.
- The absence of blush on the face makes it not alive. Don't limit yourself to just contouring powder and highlighter. It is necessary to complement your makeup with bronzing blush, matched to your skin color.
- Improperly preparing your skin for contouring can ruin your entire makeup. It is imperative to use the base. If this is not enough to even out the surface of the skin, you can apply foundation or BB cream.
- Using the wrong colors creates dirty spots on your face. You should not choose a contouring product that is too warm red or dark gray. It is better to mix warm and cool tones, and choose the color based on your skin tone. You should also avoid products with yellow tint.
- Insufficient shading of lines leads to imbalanced proportions, making facial features look unnaturally narrow or wide.
If you have problems with shading, you should use a quality brush. You shouldn’t put a lot of product on it, and it’s also important to shake off any excess.
Artist Tips
If possible, acquire basic knowledge of the basics of painting and color science. Dark tones create shadows and pull the image deeper into the background. Light shades, on the contrary, create glare, enlarge, and make the object larger.
Carefully choose an undertone that matches your skin color. For women of European appearance, cool shades of sculptor, with a pink or grayish undertone, are more suitable.
Do not use shiny products; choose black-and-white correctors that have a matte texture.
Makeup artist tips
Before starting work, moisturize the skin with a suitable cream and apply the first base layer of a product that is as close as possible to the skin color. Evaluate what you see, think about which places need to be moved into the shadows and which ones need to be brightened as much as possible.
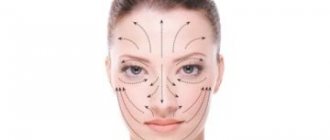
How to use a face sculptor correctly? The dark tone is applied below the line running from the top of the ear to the corner of the lips. We work the cheekbone with a brush from above, from the ear, down. Be sure to blend the edges thoroughly, otherwise you will get a bruised effect on your cheeks. If you do everything correctly, your cheekbones will visually “fall in” and your face will become narrower.
At the next stage, blush is applied above the sculptor's application line. And a brightening layer of highlighter is applied to the highest point of the cheek.
The sculptor’s dark shade is used to work on the areas above the temples, the upper part of the forehead near the hair growth area, and the area of the double chin. Matte brown shadows are suitable for experiments.
At the final stage, apply a thin translucent layer of powder. We work with soft clapping movements.
Crazy fashion trend or absolute necessity: face sculpting and cosmetics
Photo from the site: laima-makeup.ru
Many women, and even more so men, have no idea what sculpting actually is, why it is needed and what results can be achieved by skillfully applying it. True, look at photographs of stars and models in fashion magazines, they never cease to be amazed at how ideal the faces are captured there. They don’t even realize that it was the work of a professional makeup artist and skillful sculpting that made them like this, and if they want, anyone can learn this, the main thing is diligence, as well as high-quality, and not junk, face sculpting products offered by the modern market.
Contouring, sculpting or contouring the face is a kind of correction of its shape, which is done by darkening or highlighting certain areas of it to give it a special shape. This will significantly smooth out all the shortcomings, as well as significantly emphasize the advantages, adjust the shape, oval, eye shape, height of the forehead, wings of the nose, and so on. Makeup-sculpting of the face is carried out using special cosmetics offered by modern industry in a wide range.
Thus, it is sculpting that will allow you to qualitatively change what you cannot demand from nature, to make your face more expressive, memorable, bright and almost ideal. It is remarkable that such an incredible type of makeup was first used in film studios, since in the light of the spotlights the faces of people on film initially looked, to put it mildly, not in the best way. We had to look for a way out, which was found, since after such a make-up the directors and producers were completely satisfied.
Photo from the site: Babyblog.ru
Naturally, no one will do make-up-sculpting of the face, about which there is a video at the end of our article, every day, it will be difficult, it will take a lot of time, and under the bright rays of the sun, a “joke”, especially not very skillfully applied, can to be visible, but on holidays, when going to a special celebration or event, or for photo and video shooting, it doesn’t hurt to do something similar to bring your appearance to absolute perfection, at least as far as possible.
Start small: how to sculpt your face
The process of “drawing” a face will be long and painstaking, so you should definitely set aside enough time for this task, since you will have to apply cosmetics of various shades to certain places, and then carefully shade them. It is the shading that you need to spend the most time on, otherwise your makeup will look completely unnatural, like a bad mask made by a drunken puppeteer. However, it is definitely worth it, since with the usual uniform application of foundation over the entire surface, the face appears flat and monolithic.
Photo from the site: liveinternet.ru
- Much attention should be paid to determining your own face type, since this will determine how you apply toning products. There are oval, square, triangular, elongated, and mixed shapes, and all this must be understood.
- Before you start applying cosmetics to sculpt your face, you first need to completely prepare it. This means that you should wash your face in the usual way, apply a nourishing, moisturizing cream, and a special primer won’t hurt, but if you don’t have one, you can do it without it.
- Spending a lot of time shading is extremely important. This will determine how natural your face will look. There should be smooth and gradual transitions, and not clear multi-colored spots, as if you were struck by leprosy.
- Never be afraid to experiment with your own appearance, because every person is a bright individual and this should not be forgotten.
Photo from the site: nakrasilas.ru
Among other things, after applying makeup is completely finished, take a mirror and go outside, or onto the balcony. Daylight will quickly reveal all the shortcomings, which, in principle, are simply impossible to see even in a well-lit room. Many modern girls use the cameras of their own mobile phones to check, since the photographs will also clearly show the flaws in your art, which need to be urgently corrected before going out into the street like this.
Simple and affordable face sculpting: what cosmetics to use
It is clear that before embarking on such a rather complex type of makeup art, you need to figure out what is needed to sculpt your face, as well as where it is best to purchase all this stuff. By and large, you will need cosmetics here, they can be varied, as well as brushes or sponges, with which you will apply them to the surface of your pre-prepared skin. However, first you should understand that sculpting can be of two types:
Photo from the site: 1litso.ru
- Bold contouring involves thick and heavy foundations, foundations, highlighters and bronzers. It gives an amazing effect, but it significantly overloads your face, so it is imperative to make it high-quality, and this will not be easy the first time, but it definitely makes sense to practice.
- Dry sculpting is suitable for daily use, since you only need to use dry cosmetics, for example, powder or blush.
The best face sculpting products: choose quality
Global cosmetics manufacturers have long made sure that every woman has the opportunity to choose exactly those cosmetics that suit her best. In cosmetics stores there are specially equipped sets of concealers and correctors for face sculpting, with pre-selected shades that combine perfectly with each other. However, even in this case, it may happen that you will have to separately assemble your own line, which will most accurately match the type and shade of your skin, the shape and structural features of your face.
It is worth paying special attention to the fact that all products that are applied for the purpose of correcting the shape, that is, for contouring, must be matte, otherwise you will shine like a Christmas tree. If in December such makeup may be appropriate, then in the midst of the July heat it will definitely look defiant, vulgar and ridiculous.
- Cream correctors for face sculpting are used for oily correction; they are most often collected in special palettes, but keep in mind that it is not at all necessary to apply them all at once.
- You need to choose three shades that you can use, and the darkest one should be a shade or two darker than your skin tone, and the other two lighter.
- Dry products are suitable for every day, these are powder, blush, dry highlighters and bronzers. They do not give a mask effect, so they will not stand out much even under the hot summer sun. Sculpting the face with dry correctors will also save time on makeup, and for many modern women, this is a critical indicator.
- For dry, delicate or hypersensitive skin, it is better to give preference to correctors with a creamy consistency, and make sure that they contain caring ingredients.
- For oily skin, it is best to choose products with a mattifying effect, so the makeup will last longer and will not “float” at the most inopportune moment.
- Dry powders, blushes and bronzers are also great for oily skin; they will reliably hide the unsightly greasy shine and make the skin velvety and smooth.
Photo from the site: mylovin.ru
The most important thing is not to waste time and money on purchasing cheap products sold from a tray on the market, since you definitely won’t be able to achieve an ideal result with their help. It is best to give preference to branded cosmetics, although they have a much higher cost. A junk product for a pittance can still lead to rashes, irritation and itching, since the concealer will cover the entire face. It is worth carefully weighing all the pros and cons, and the risk is definitely not appropriate here, because this is your face, with the problems of which you will then have to struggle for a long time and painfully.
Choosing a face type and correction methods
Nature has endowed us with faces of excellent shape. Some are the happy owner of an oval, while others have it round, square or even triangular. The situation is corrected by hairstyles and knowledge of how to properly apply face sculpting. Determine your type and boldly begin experiments to improve your appearance.
Inverted triangle or heart face
A girl with this type is easy to recognize. Her face is wide at the top at the temples, and her chin is narrow, often sloping.
The purpose of modeling: to balance the upper and lower parts.
What we do:
- We visually expand the chin and apply the sculptor’s light tone to it.
- To attract attention, highlight the middle part - forehead, areas under the eyes, cheekbones.
- We apply a dark shade to the cheeks and temple areas, the face will appear narrow at the top.
Round form
Goal: to make it visually narrower.
Stages of work:
- We highlight the area in the middle of the forehead, above the cheekbones under the eyes, and the chin.
- We darken the side parts of the face that stand out from the ideal oval - temples, cheeks, jaw line.
Diamond shape
The owners of such faces have the widest part in the cheekbone area. Along the imaginary line of the temples and in the area of the lower jaw, the face is much narrower.
The purpose of the work: to soften overly pronounced cheekbones, to give the oval a more rounded outline.
Modeling:
- To widen the forehead and chin, we treat them with a light shade.
- We also apply highlighter above the cheekbones and under the eyes. This will draw attention to the middle part.
- The dark tone is applied to the cheekbones to achieve the maximum effect of the narrowness of this part of the face.
Square shape
Equally wide in all projections: along the cheekbones, forehead, lower jaw. It looks a bit heavy.
Goal: to give the entire face smooth outlines, soften the heavy angles of the lower jaw, and lighten the shape.
Our actions:
- Apply a light highlighter to the center of the chin, the area under the eyes above the cheekbones and on the forehead.
- Dark tone - at the temple along the hairline and protruding corners of the lower jaw.
Features and types of facial sculpting
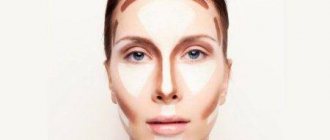
Facial sculpting is a process of visual adjustment using makeup. Some parts need to be lightened, others, on the contrary, darkened, resulting in a play of light and shadows on the face. With proper sculpting, the face will appear visually thinner, and the lines of the cheekbones, nose, and chin will become softer and more graceful.
An oval face shape is considered ideal. If you are the owner of just such a shape with subtle expressive features, then the number of actions in the sculpting process is reduced to a minimum. You will only need to slightly highlight the cheekbone area using dark shades of the corrector, and highlight the center of the face with light shades.
You need to highlight those areas that you want to emphasize; for this you should use a highlighter. These areas include the center of the face: forehead, area around the eyes, under and above the eyebrow, bridge of the nose and center of the chin. If the face is wide, then the product should be applied with vertical strokes, and if, on the contrary, it is too narrow, then with horizontal strokes.
And those parts of the face that need to be hidden are darkened. The dark color corrector is applied to the contour of the face, as well as to the cheekbones, neck and nose (if it is necessary to visually narrow it).
If you compare photographs of the face before and after the adjustment process, you will notice: the appearance is noticeably transformed. It is worth noting that methods of applying products, techniques and schemes can be very diverse.
As soon as this type of makeup appeared, it was used only to create images for stage, film and catwalk stars. And only a few years later it began to be used by ordinary girls.
Today there are two types of sculpture:
- Dry
. Perfect as a step in applying daytime daily makeup. During the correction process, you need to use only dry products - powder, blush, eye shadow. You need to apply and blend the products with a brush. - Fat
. For this look, thick creams, foundations, bronzers and highlighters are used. This type of contouring requires careful handling and careful shading of cosmetic products. After all, oily products overload the face, and an undesirable doll mask effect can be created. This type of adjustment takes longer than dry adjustment.
It is important to remember that you should not overdo it with contouring, because you are not doing makeup for the catwalk or stage, you cannot allow it to be noticed from afar. The main goal of the adjustment is soft and refined facial contours, as natural and natural as possible.
A few words about nose modeling
In order to visually widen or narrow the nose, apply a light-colored sculpting strip of the desired width to its back. Carefully blend the borders. Darken the sides of the nose. Do you want your nose to appear visually shorter? Apply a dark tone to its tip. You can work with either a brush or your fingers. The main thing to remember is smooth border crossings.
To look perfect, you need to practice more often. We wish you to successfully develop your skills, shine when going out and look natural at the same time.
Face contouring (part 2)
Hello to all gossip girls!
Today I decided to continue the topic of contouring, namely using cream textures. The principle of sculpting is the same as with powdery textures: we darken those parts that we want to visually reduce/shade, we highlight those areas that, on the contrary, we want to highlight.
Sculpting using cream textures can vary. I understand perfectly well that most ladies associate such contouring exclusively with a ton of cosmetics on the face in the “a la Kardashian” style, but this is not always correct. You need to understand that each makeup must correspond to the time of day/event. For example, for a photo shoot or an evening out, of course, a “dramatic” contour like Kim’s would be suitable. In everyday life, you can and should get by with a lighter contour, but light in this context does not mean at all that in the daytime you should forget about cream contouring.
Personally, I prefer cream contour more and, in my opinion, very often it can look even more natural than contour using powder textures. Of course, the most important rule (as, in my opinion, in all makeup) is shading, shading, and once again good shading. If a powder product may not always lend itself to perfect blending, then with creamy textures things are different; if desired, they can be perfectly shaded to almost “zero” and create the effect of a second skin without any visible streaks or other nastiness on the face.
The contouring scheme is exactly the same as when using powder textures:
The light colors in the diagram highlight those parts that we want to highlight, in this case, highlight. I want to make a footnote right away here. Maybe someone will disagree with me, but I think that highlighting with cream textures should be safely skipped by those who call themselves snow whites. If even the lightest concealer blends with your complexion, then there is no point in putting on an extra layer of makeup; you can get by with a powder highlighter/highlighting powder (this does not negate the use of a corrector in the eye area, it always refreshes the look and makes the face more expressive, even if You have very small bruises under your eyes).
Here are live examples of cream contouring. Most of them, of course, relate to that same “dramatic” sculpture that is suitable for photo shoots and evening events. We pay attention to exactly where the dark and light accents are placed.
I always use a small “base” in the form of foundation/bb cream for contouring. I even out the overall tone of the face, and then proceed to the contouring itself. But as you can see from the photographs, it is not always necessary to do this, you can get by with light and dark products for contouring, it all depends on the condition of your skin, on the “heaviness” of the products used. Since at the moment I am snow-white, I use foundation, and then I place only dark accents, highlighting the area exclusively under the eyes, because the rest of my face is so light that all light correctors simply blend into the tone of my face.
We place the necessary accents and then shade them thoroughly. It is important to remember that we do not want to smear everything in one heap over the face, mixing light and dark, we shade it carefully, but do not go beyond the boundaries, otherwise the meaning of contouring is simply lost. After that we simply set everything with powder. In my case, it’s a lightening product under the eyes and a colorless powder for the rest of the face.
I think that the general scheme is, in principle, quite clear; for clarity, you can watch the video.
Let's focus on contouring the nose. Of course, everyone's nose shape is different and unique in its own way. I have selected diagrams for sculpting the main common forms. The standard principle of sculpting also works in this case: to “reduce” some area, we use a dark color, to “enlarge”/highlight this or that area, we lighten it, use a highlighter.
Be sure to shade our outline well; there should be no clear boundaries that catch the eye. We shade it very carefully, without smearing the “shadow” into unnecessary areas, the same applies to the highlighted areas.
So,
1. Wide/flat nose.
To make it narrower, we draw a sculpting line straight from the beginning of the eyebrow to the end of the nose. I would not recommend using a light concealer for this nose shape.
2. Potato nose.
Sometimes, to contour a similar nose shape, only darkening the nostrils is enough. If you are not entirely satisfied with the result and want to further improve your nose, draw a contour from the beginning of the eyebrow, as in the picture. We use a light corrector strictly in the center of the bridge of the nose.
3. Triangular nose. (When the nose flares evenly downwards, the nostrils are noticeably wider compared to the top of the nose, a triangle shape).
We contour the nose in the nostril area, as in the picture. We highlight the area near the inner corner of the eye, as in the picture.
4. Crooked nose.
The form is quite rare, but sometimes you can still meet a person with a crooked nose, for example, due to a fracture. On the one hand, we draw a clear dark line, which visually gives us the illusion of a shadow that actually does not exist. On the contrary, we highlight the other side (where the nose “looks”).
5. Very thin nose.
To visually slightly “expand” the nose, we highlight the areas, as in the picture.
6. A nose with a pronounced bridge (a hump nose, an eagle nose, as you wish)).
We highlight the area between the eyebrows, as in the picture.
As you can imagine, many products can be used for cream contouring. For darkening, a dark foundation, cream bronzer, or concealer that is darker than your skin tone may be suitable. For highlighting, correctors/concealers that are lighter than your skin, highlighters (in the form of a pencil with a brush) and foundations in lighter colors are suitable.
I want to highlight just my biggest favorites for cream contouring, without doing a huge review of all possible products for this procedure, as I did before
For darkening, I most often use the following products:
— Nars multiple “malibu”
. I was very skeptical about this product when it was recommended to me for contour, because first of all it seems to be a blush. It turned out that it perfectly contours the face. Firstly, it is very durable and does not creep anywhere, I do this: I draw a line, immediately shade it, then draw a line and so on, it “sets” very quickly, then it will be difficult to shade it. This shade has a slightly red undertone, which looks very natural (at least on my face). Don't be afraid of the glitter, they disappear as soon as you start blending the product on your face. The shade Malibu suited me.
— Bobbi brown foundation stick.
Very cool product, blends perfectly, creamy and soft. And very economical! I have the shade Almond, it looks very dark, but it blends out incredibly well, so it looks very natural!
This kind of product can be found not only in luxury brands; you can easily find in more budget brands the same foundations that are darker than your complexion, dark correctors, etc.! This also applies to foundations/correctors in stick form, which are now available in budget brands
For highlighting, I prefer the following products:
— Mac prep + prime highlighter.
I love it, I love it, it illuminates the face perfectly and doesn’t bleed anywhere.
I especially love the light boost
with yellow undertones, I highly recommend it!
— Make up for ever lift concealer.
Another favorite, lasts great all day, highlights well, very economical! I have number 3, it has a slightly pinkish undertone, but still it suits me perfectly, having a warm skin tone.
Of the budget highlighting products, I have two favorites that work at 5+. One of them is a highlighter in the form of a brush L'oreal lumi magique, the other is Maybelline eraser concealer (we call it The Eraser micro-corrector).
That's all for today!) Have a nice evening everyone! If you have any questions, feel free to ask)
PS All old posts have been restored here on Gossipnik, whoever was looking for them - look in the profile, thank you very much dear Editorial Board, in particular the Moderator